Overview
You can post any residential property to your agency's Facebook Page and Instagram account without leaving Loop. Loop builds the caption from the property details, drops the photos into your branded image design, and puts the right team's logo and colours on for you. You choose where it goes, check the preview alongside, and either post it there and then or schedule it for later.
Facebook and Instagram are available now. LinkedIn is not available yet.
Where things live. Posting happens on the property record, under Send. Your templates are set up once in Settings, then Social Media. The Social Media item in the main menu is where you keep an eye on what is scheduled and what has already gone out. This article covers all three, in that order.
Before you start, an account admin needs to have connected your social accounts and assigned them to your team. If that has not happened, the platforms will not be there to select. See Connecting your social media accounts.
Post a property
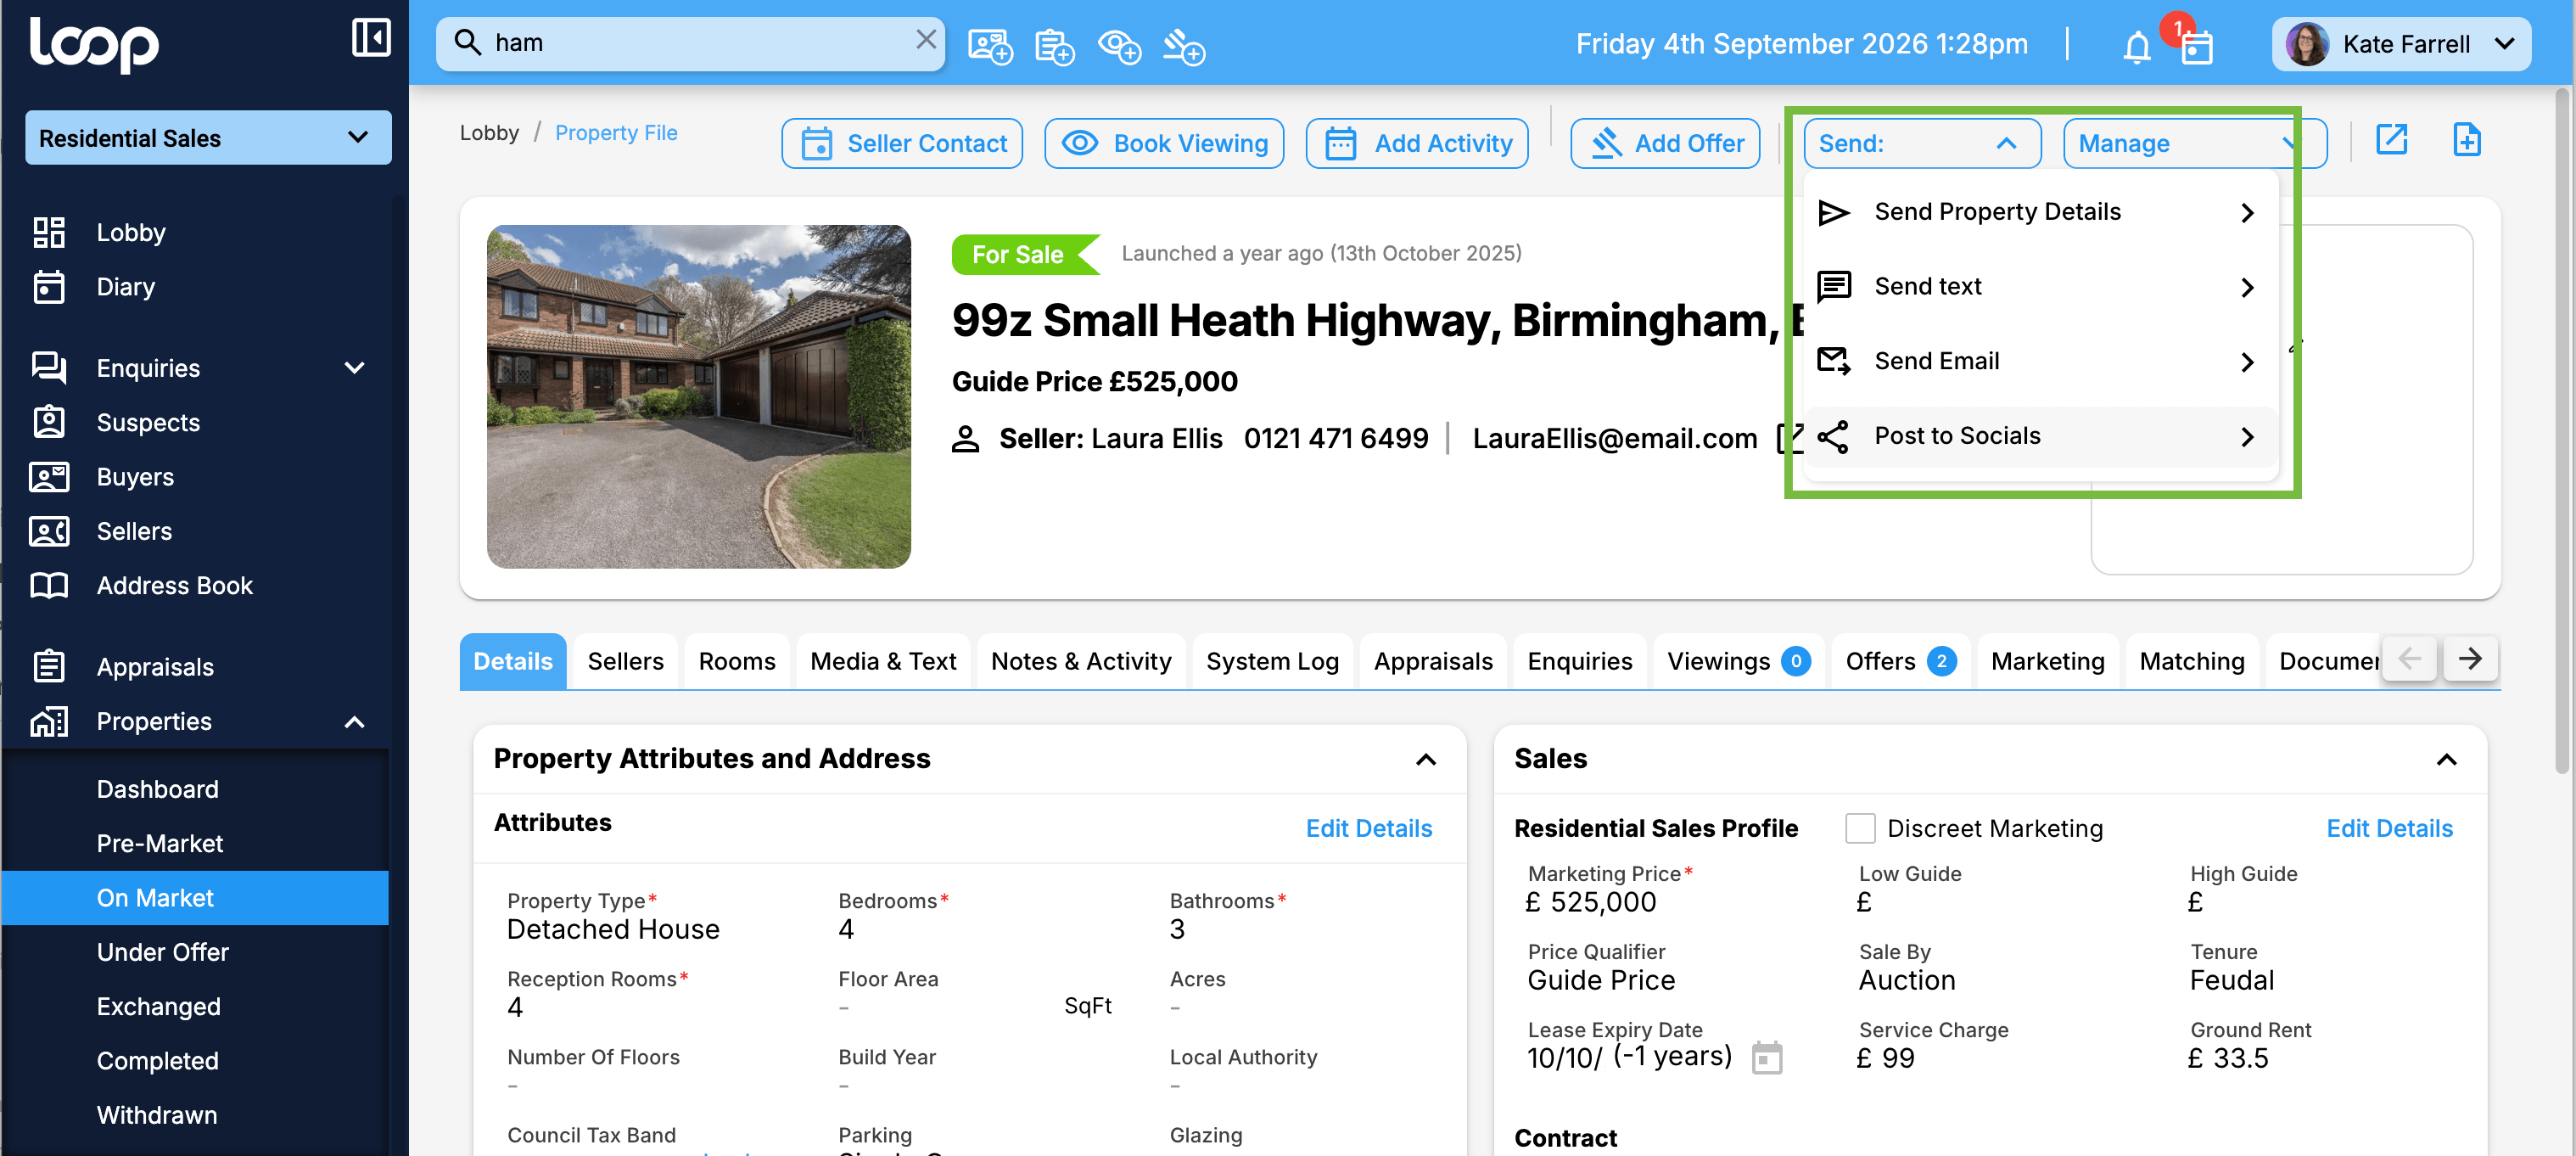
This all happens on the property record.
Open the property and check its details are up to date. The caption and the image are built from what is on the property record, so anything missing there will be missing from the post.
Select Send, then Post to Socials. The composer opens, with your choices on the left and a live preview on the right that updates as you go.
Template. Pick a post template. Each one shows its name and the image design it uses. This decides both the wording of the caption and how the image looks. If there is nothing to pick from yet, someone needs to set one up first, which is covered under Setting up post templates below.
Caption. Loop fills the caption in from the property, and tells you which template it came from. Read it through and change anything you want to say differently this time. Editing here affects this post only, not the template.
Platforms. Choose where it goes. You will only see platforms your team has an account assigned to, each showing the Page or account name so you know exactly where it is going.
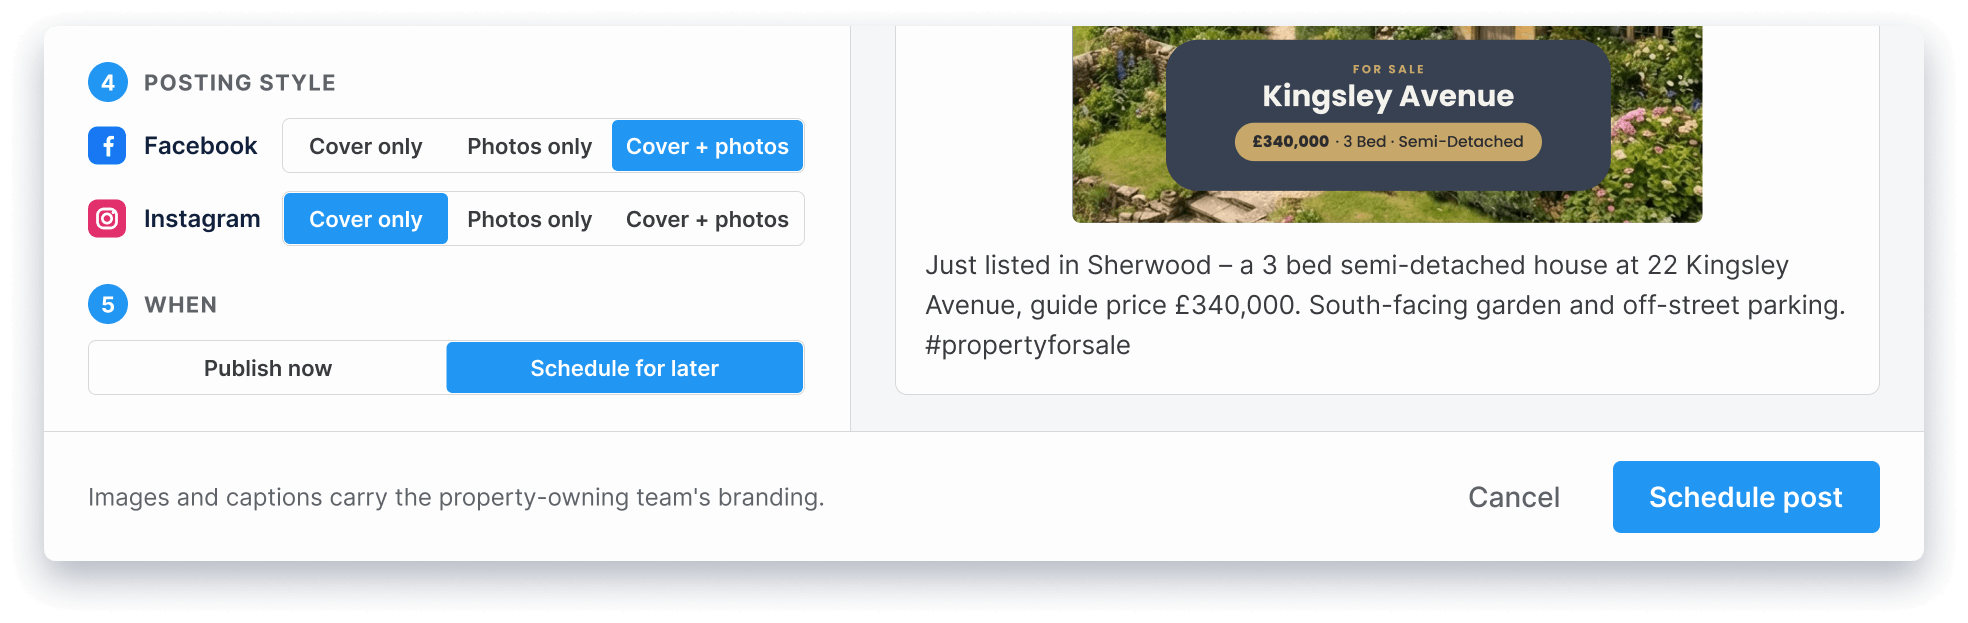
Posting style. Set this for each platform separately:
Cover only posts the designed image on its own, with the property photo inside it.
Photos only posts the property photographs as they are.
Cover + photos posts the designed image first, followed by the photographs, as a carousel where the platform allows it.
When. Choose Publish now or Schedule for later.
Check the preview on the right, then select Publish now at the bottom.
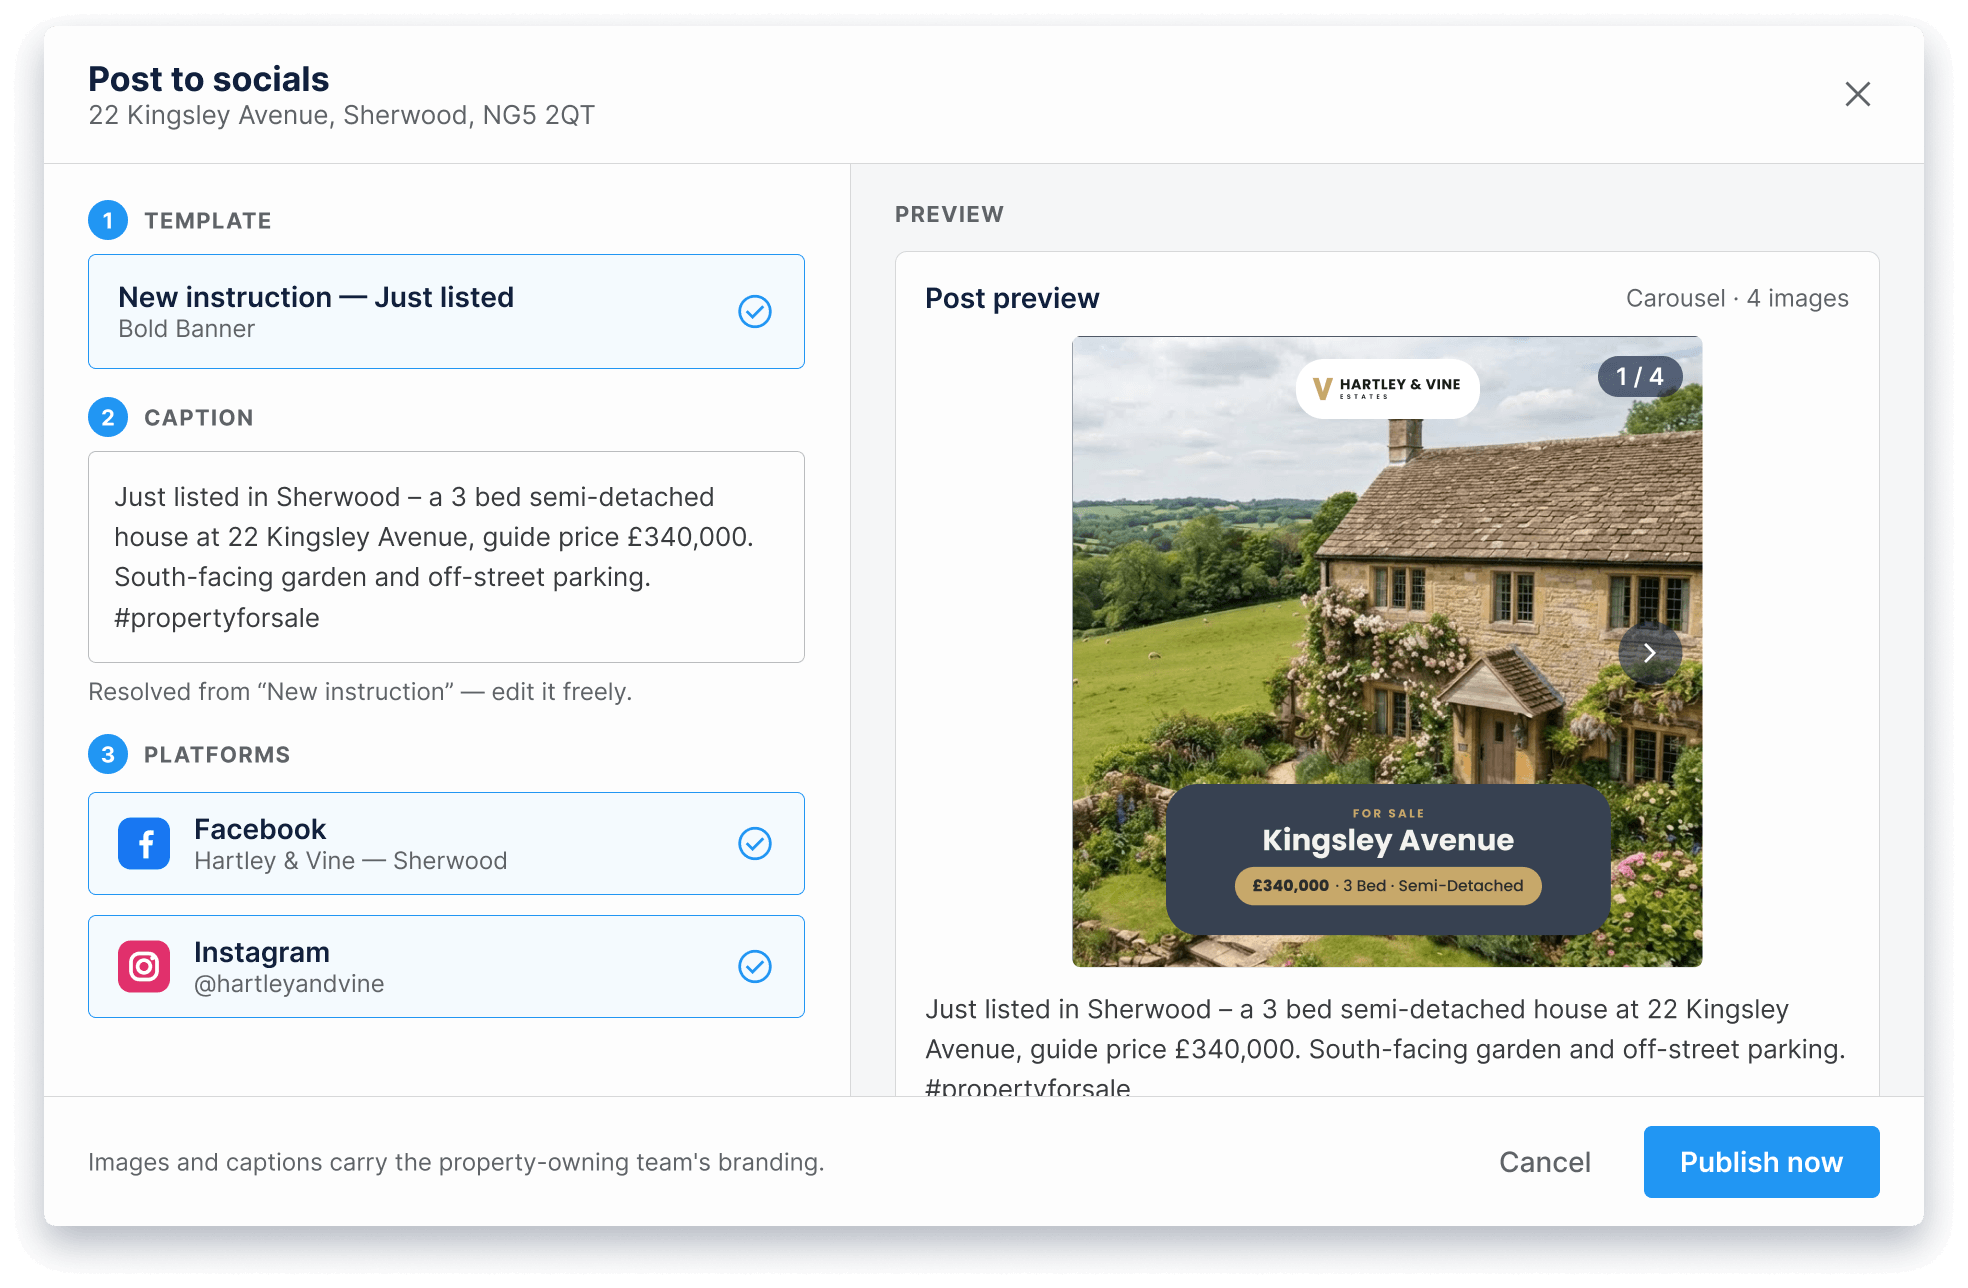
Once it has gone, you will see the result for each platform separately, with a link to the post where the platform gives us one. If one platform works and another does not, you will see exactly which failed and why, and the one that worked stays up.
Scheduling instead of posting now
Choosing Schedule for later at step 7 adds a date and a time to fill in, and the button at the bottom changes to Schedule post. Times are UK time, and they follow the clocks, so a post set for 9am fires at 9am in March and in November alike.
The post is built when it sends, not when you schedule it. This is worth understanding, because it is the opposite of how most schedulers work. Loop takes a fresh look at the property at the moment it sends, so a price reduction, a new photograph or a tidied-up description between now and then all make it into the post without you doing anything. The other side of that is that the preview you see when you schedule is a guide rather than a promise.
If the property's status changes, the post does not go. If it goes SSTC, sells, lets or is withdrawn between scheduling and sending, Loop cancels the post and tells you, rather than putting out something that is no longer true. Changes that are not status changes, like price and photographs, flow through as described above.
You are told what happened either way, in Loop and by email. That covers a post going out, a post going out to some platforms but not others, a post failing, and a post being cancelled because the property moved on.
If the property has no usable photographs when the time comes and your chosen style needs them, the post is held and flagged to you rather than going out empty.
Scheduled posts are managed from the dashboard, which is covered further down.
If you cannot post
A platform is not there. Your team does not have an account assigned for it. An account admin can sort this out in Settings.
Loop will not let you post at all. If you have picked a style that needs property photographs and the property has none, Loop stops you rather than sending an empty post. Add the photographs and try again.
Not all the photos went out. Instagram limits how many images a single post can carry, and it only accepts certain shapes. The preview shows you this beforehand so there are no surprises afterwards.
Setting up post templates
Everything in this section is a one-off job in Settings, then Social Media. You do not need to come back to it every time you post.
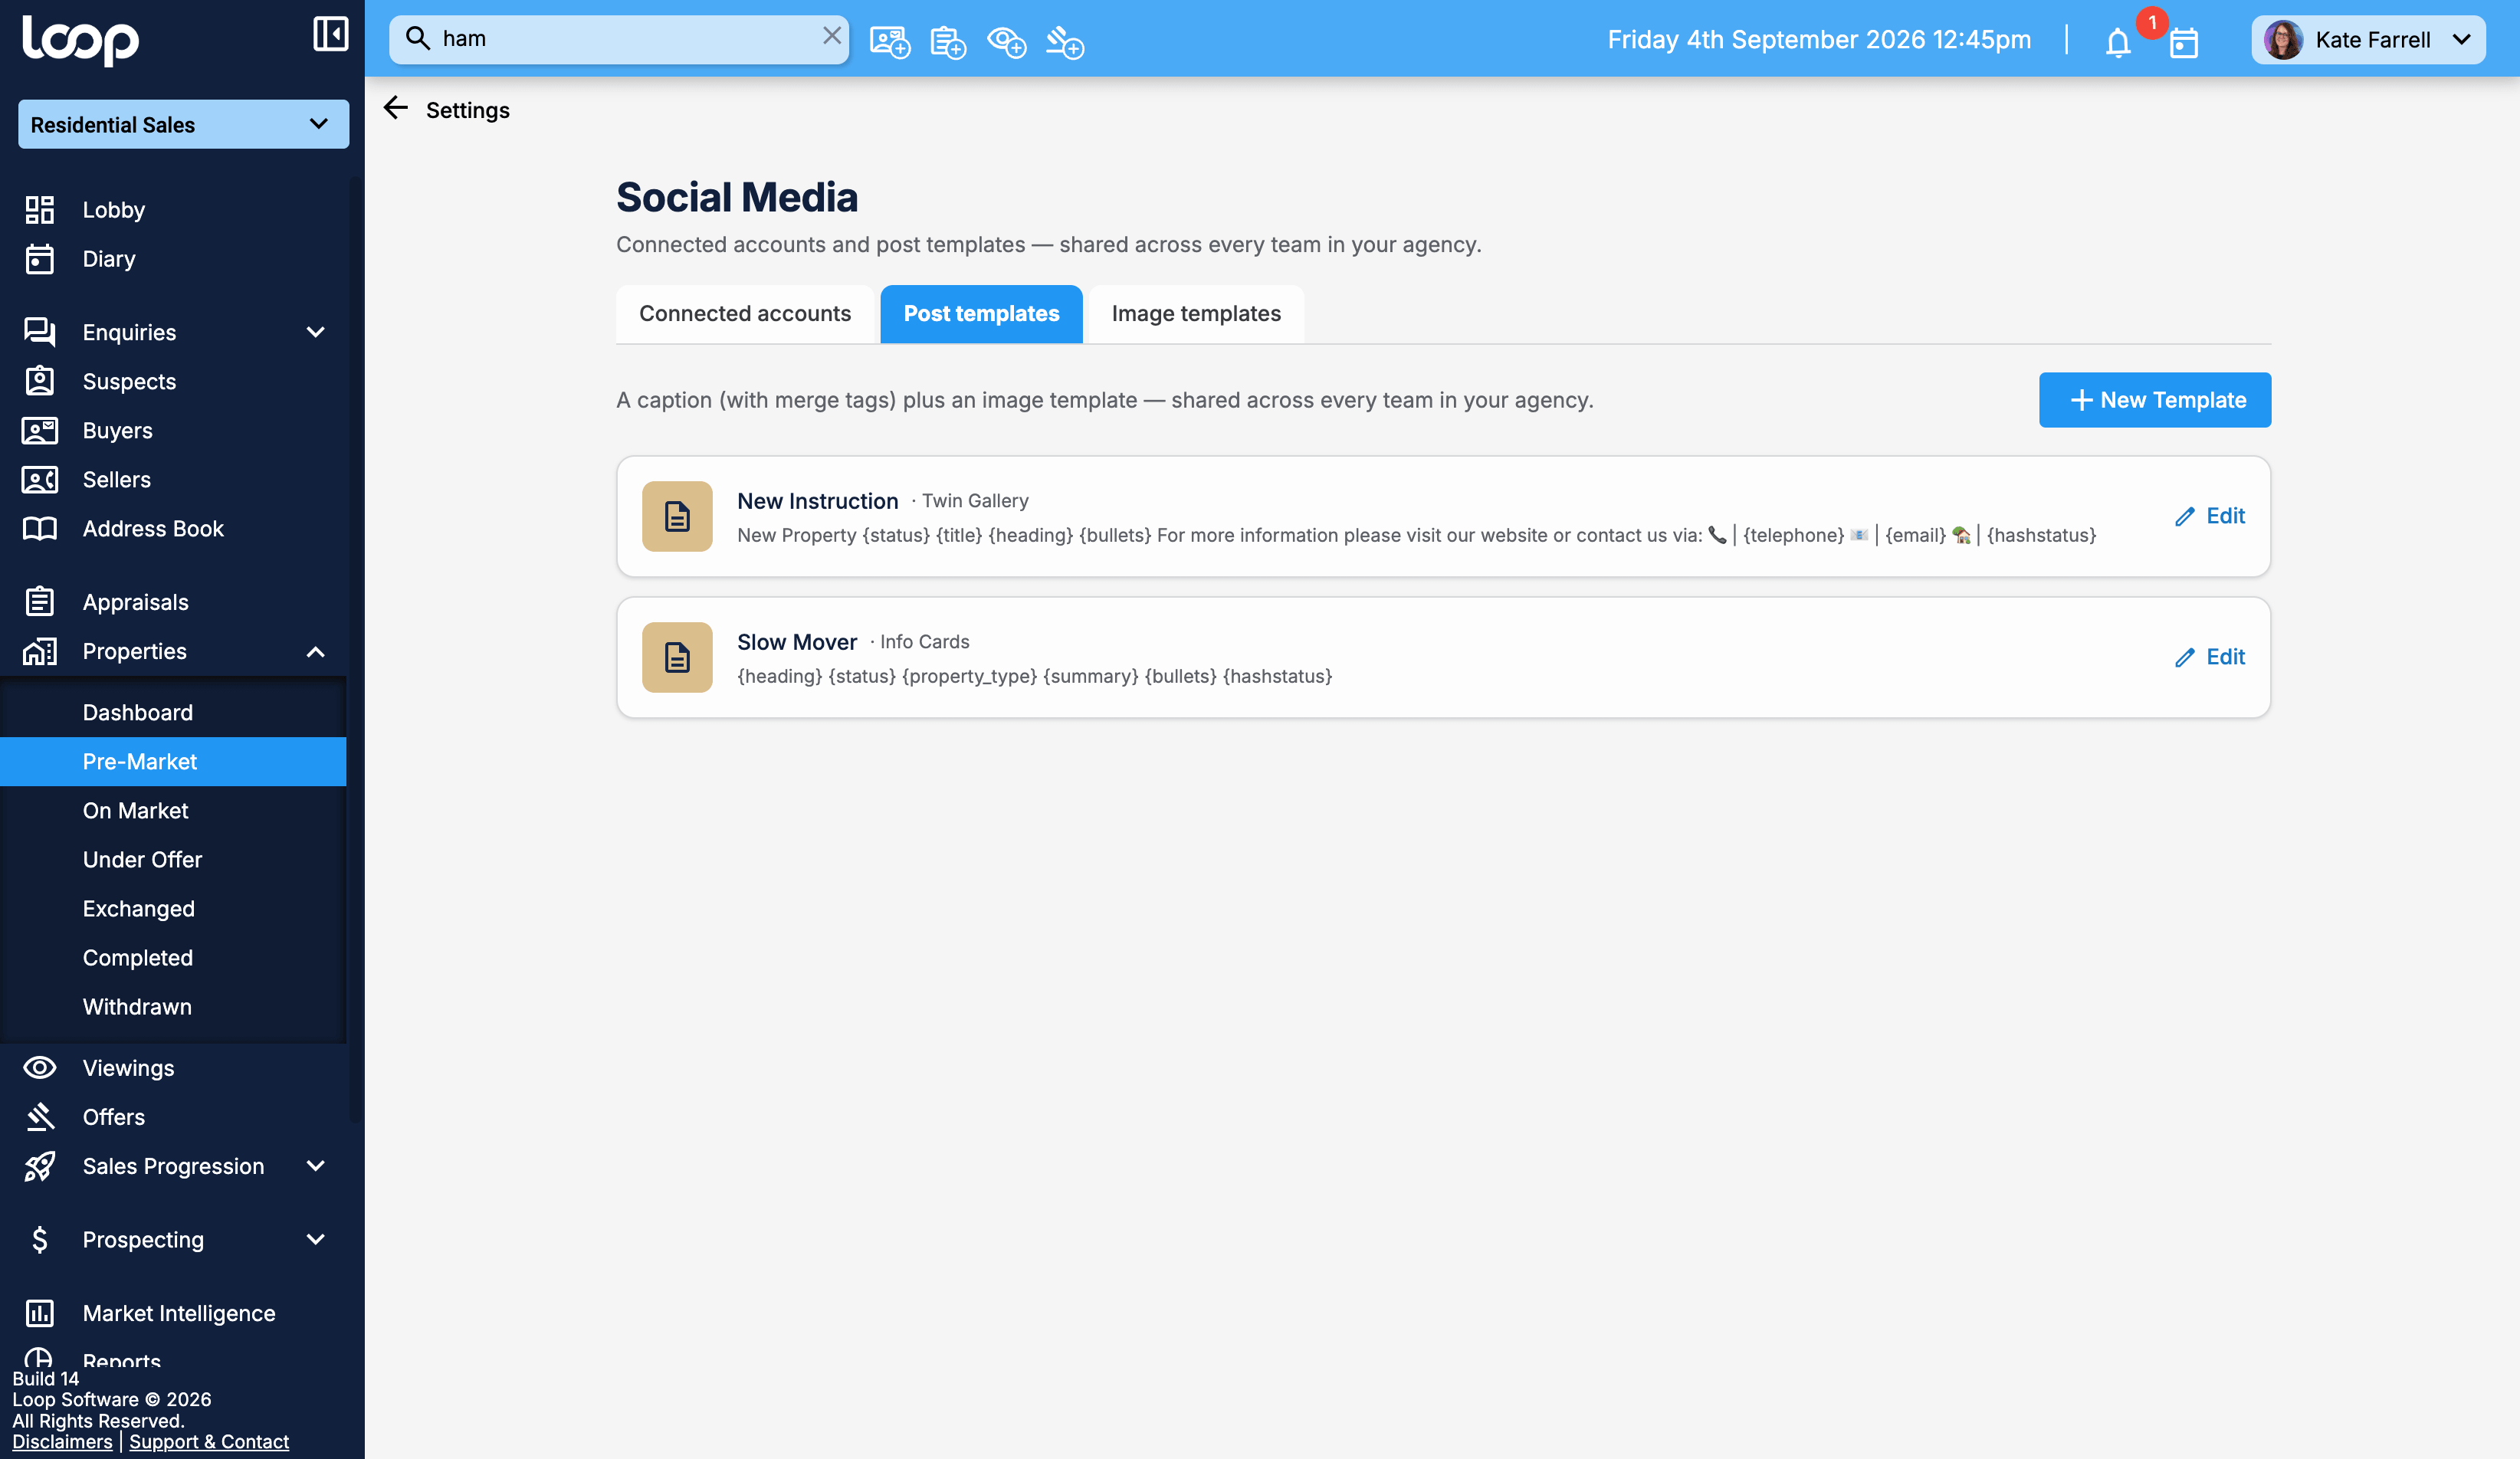
A post template is the wording of your caption plus the image design that goes with it. Anyone in your agency can create one, and templates are shared across every team, so it is worth setting up a few good ones rather than everybody writing their own.
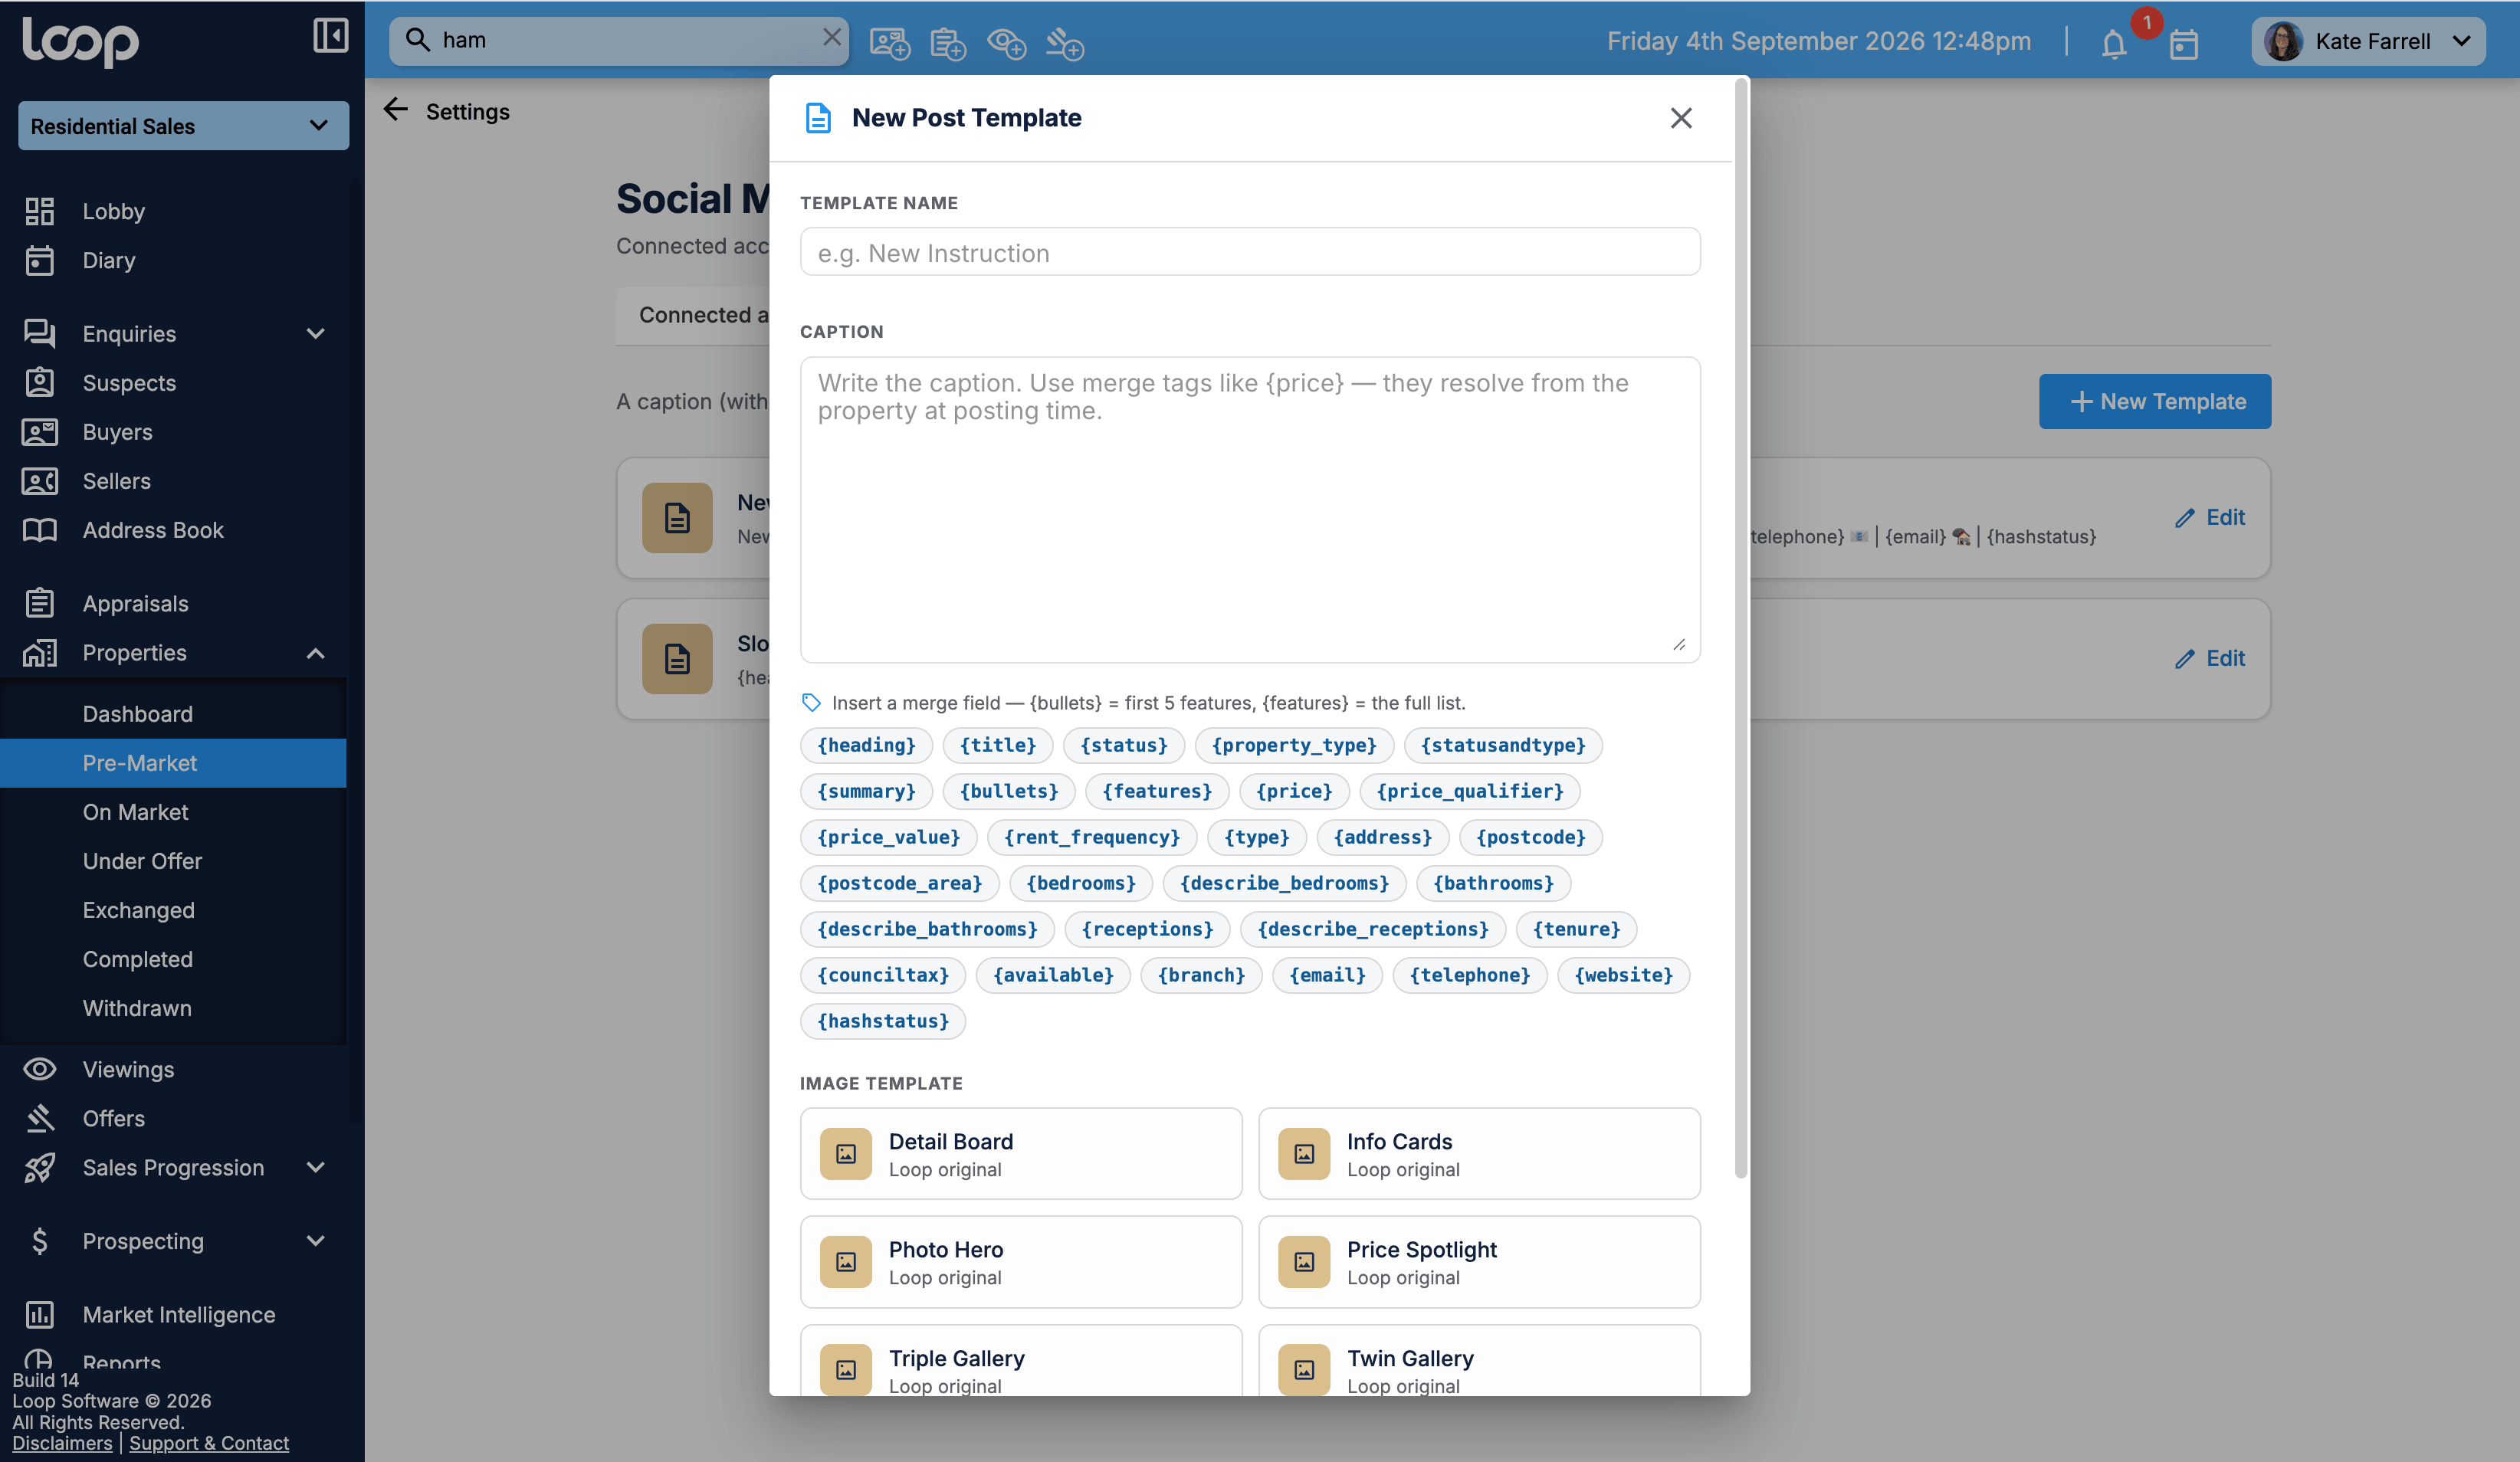
Go to the Post templates tab and select New Template. Give it a name that says what it is for, write the caption, choose an image design from the list, and save. It is then available to everyone next time they post a property. The list shows each template with a preview of its caption, and an Edit link to change one later.
Merge tags
Rather than typing property details into every post, you write the caption once using merge tags. A merge tag is a word in curly brackets that gets swapped for the real detail when the post is built. You can type them, or select one of the tag buttons under the caption box to drop it in where the cursor is.
So a template that says:
New Property {status}
{title}
{heading}
{bullets}
For more information please visit our website or contact us via:
{telephone}
{email}
{hashstatus}
comes out as:
New Property For Sale
30 Lion Lane, Haslemere
For Sale 2 Bed Detached Bungalow £169,500
2 bedroom bungalow
Centrally situated
Garage and parking
Gardens
For more information please visit our website or contact us via:
01242 371093
sales@example.com
#propertyforsale
The caption is not written for you by anything clever. It is your wording with the property's details slotted in, which is why the same template gives you a consistent post every time.
Here are the tags you can use.
The property
Where it is
Rooms
Price and terms
Your team
Contact details always come from the team that owns the property, so a template using {telephone} gives the right number for whichever office the property belongs to.
If a property has nothing recorded for a tag, the tag comes out empty rather than showing the tag itself. It is worth previewing a property with a few gaps in it to see how your wording reads without them.
Customising an image design
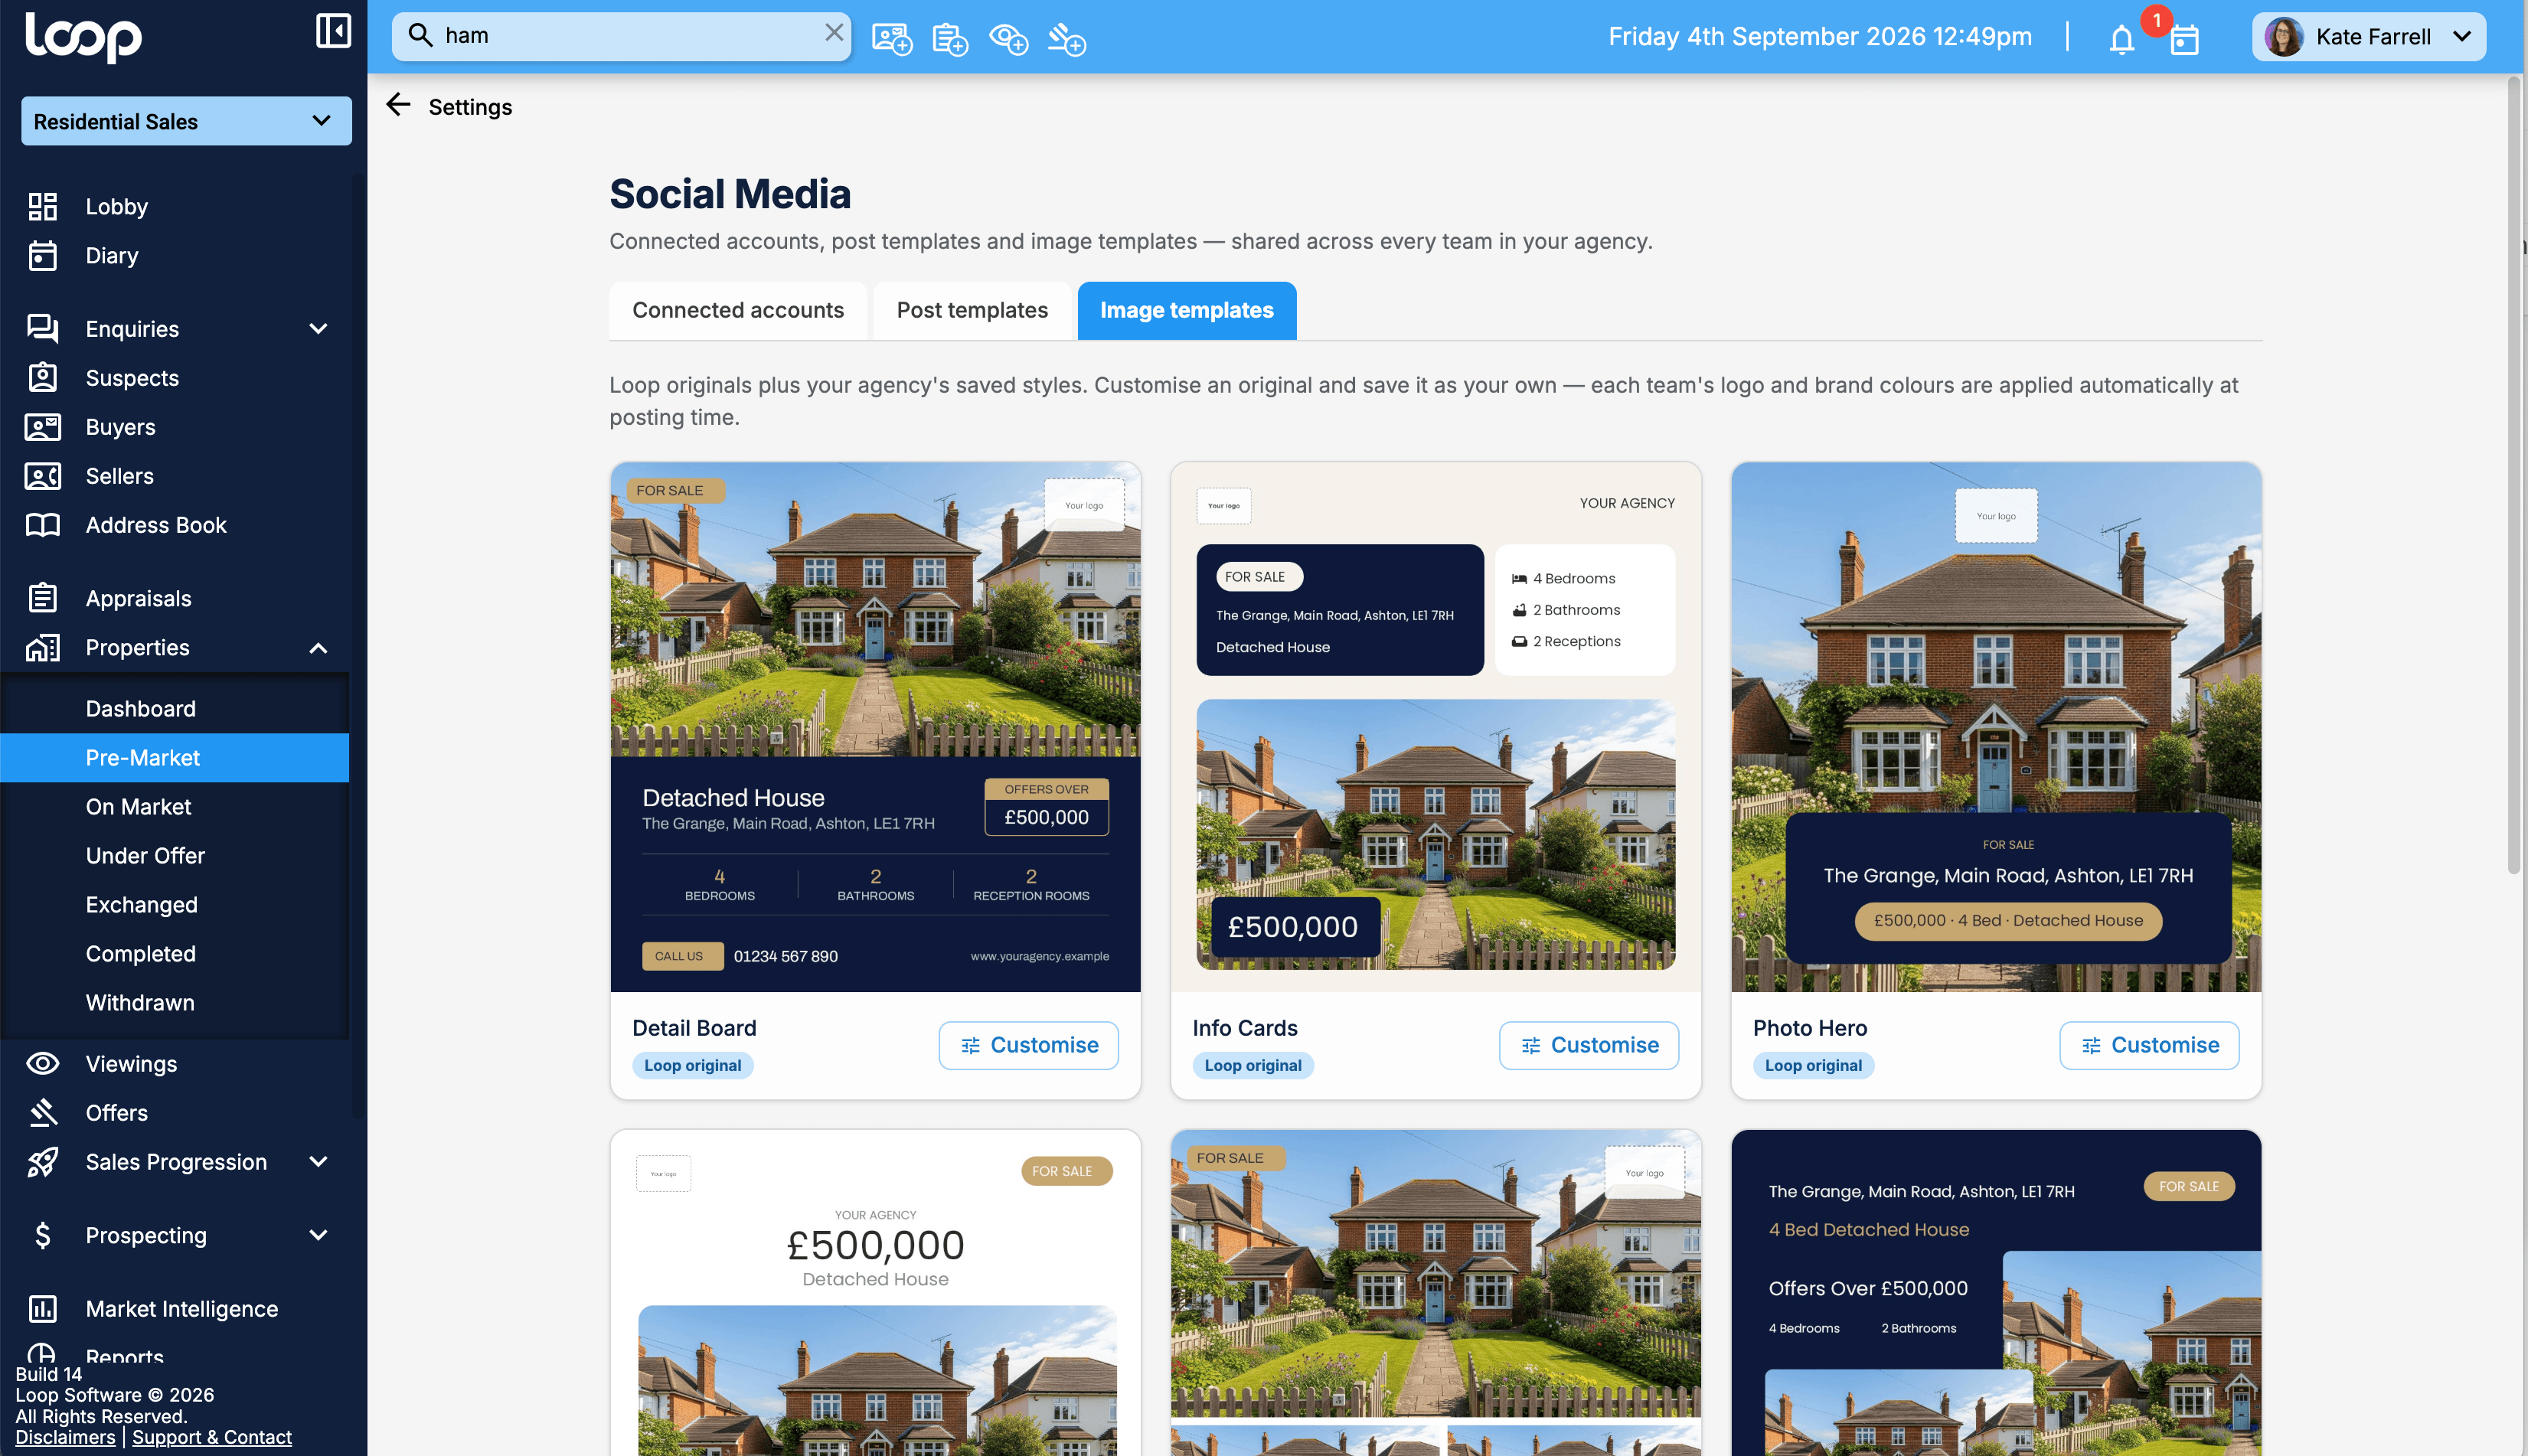
Loop provides a set of image designs, with names like Detail Board, Info Cards, Photo Hero, Price Spotlight, Triple Gallery and Twin Gallery. You can also take one of those, change it to suit your agency, and save it as your own.
Go to the Image templates tab, find the design you want to start from, and select Customise.
The settings you see depend on which design you started from, because each one offers its own set. A design might give you a card colour, an accent colour, a line of text on the image, a font, and whether the logo shows.
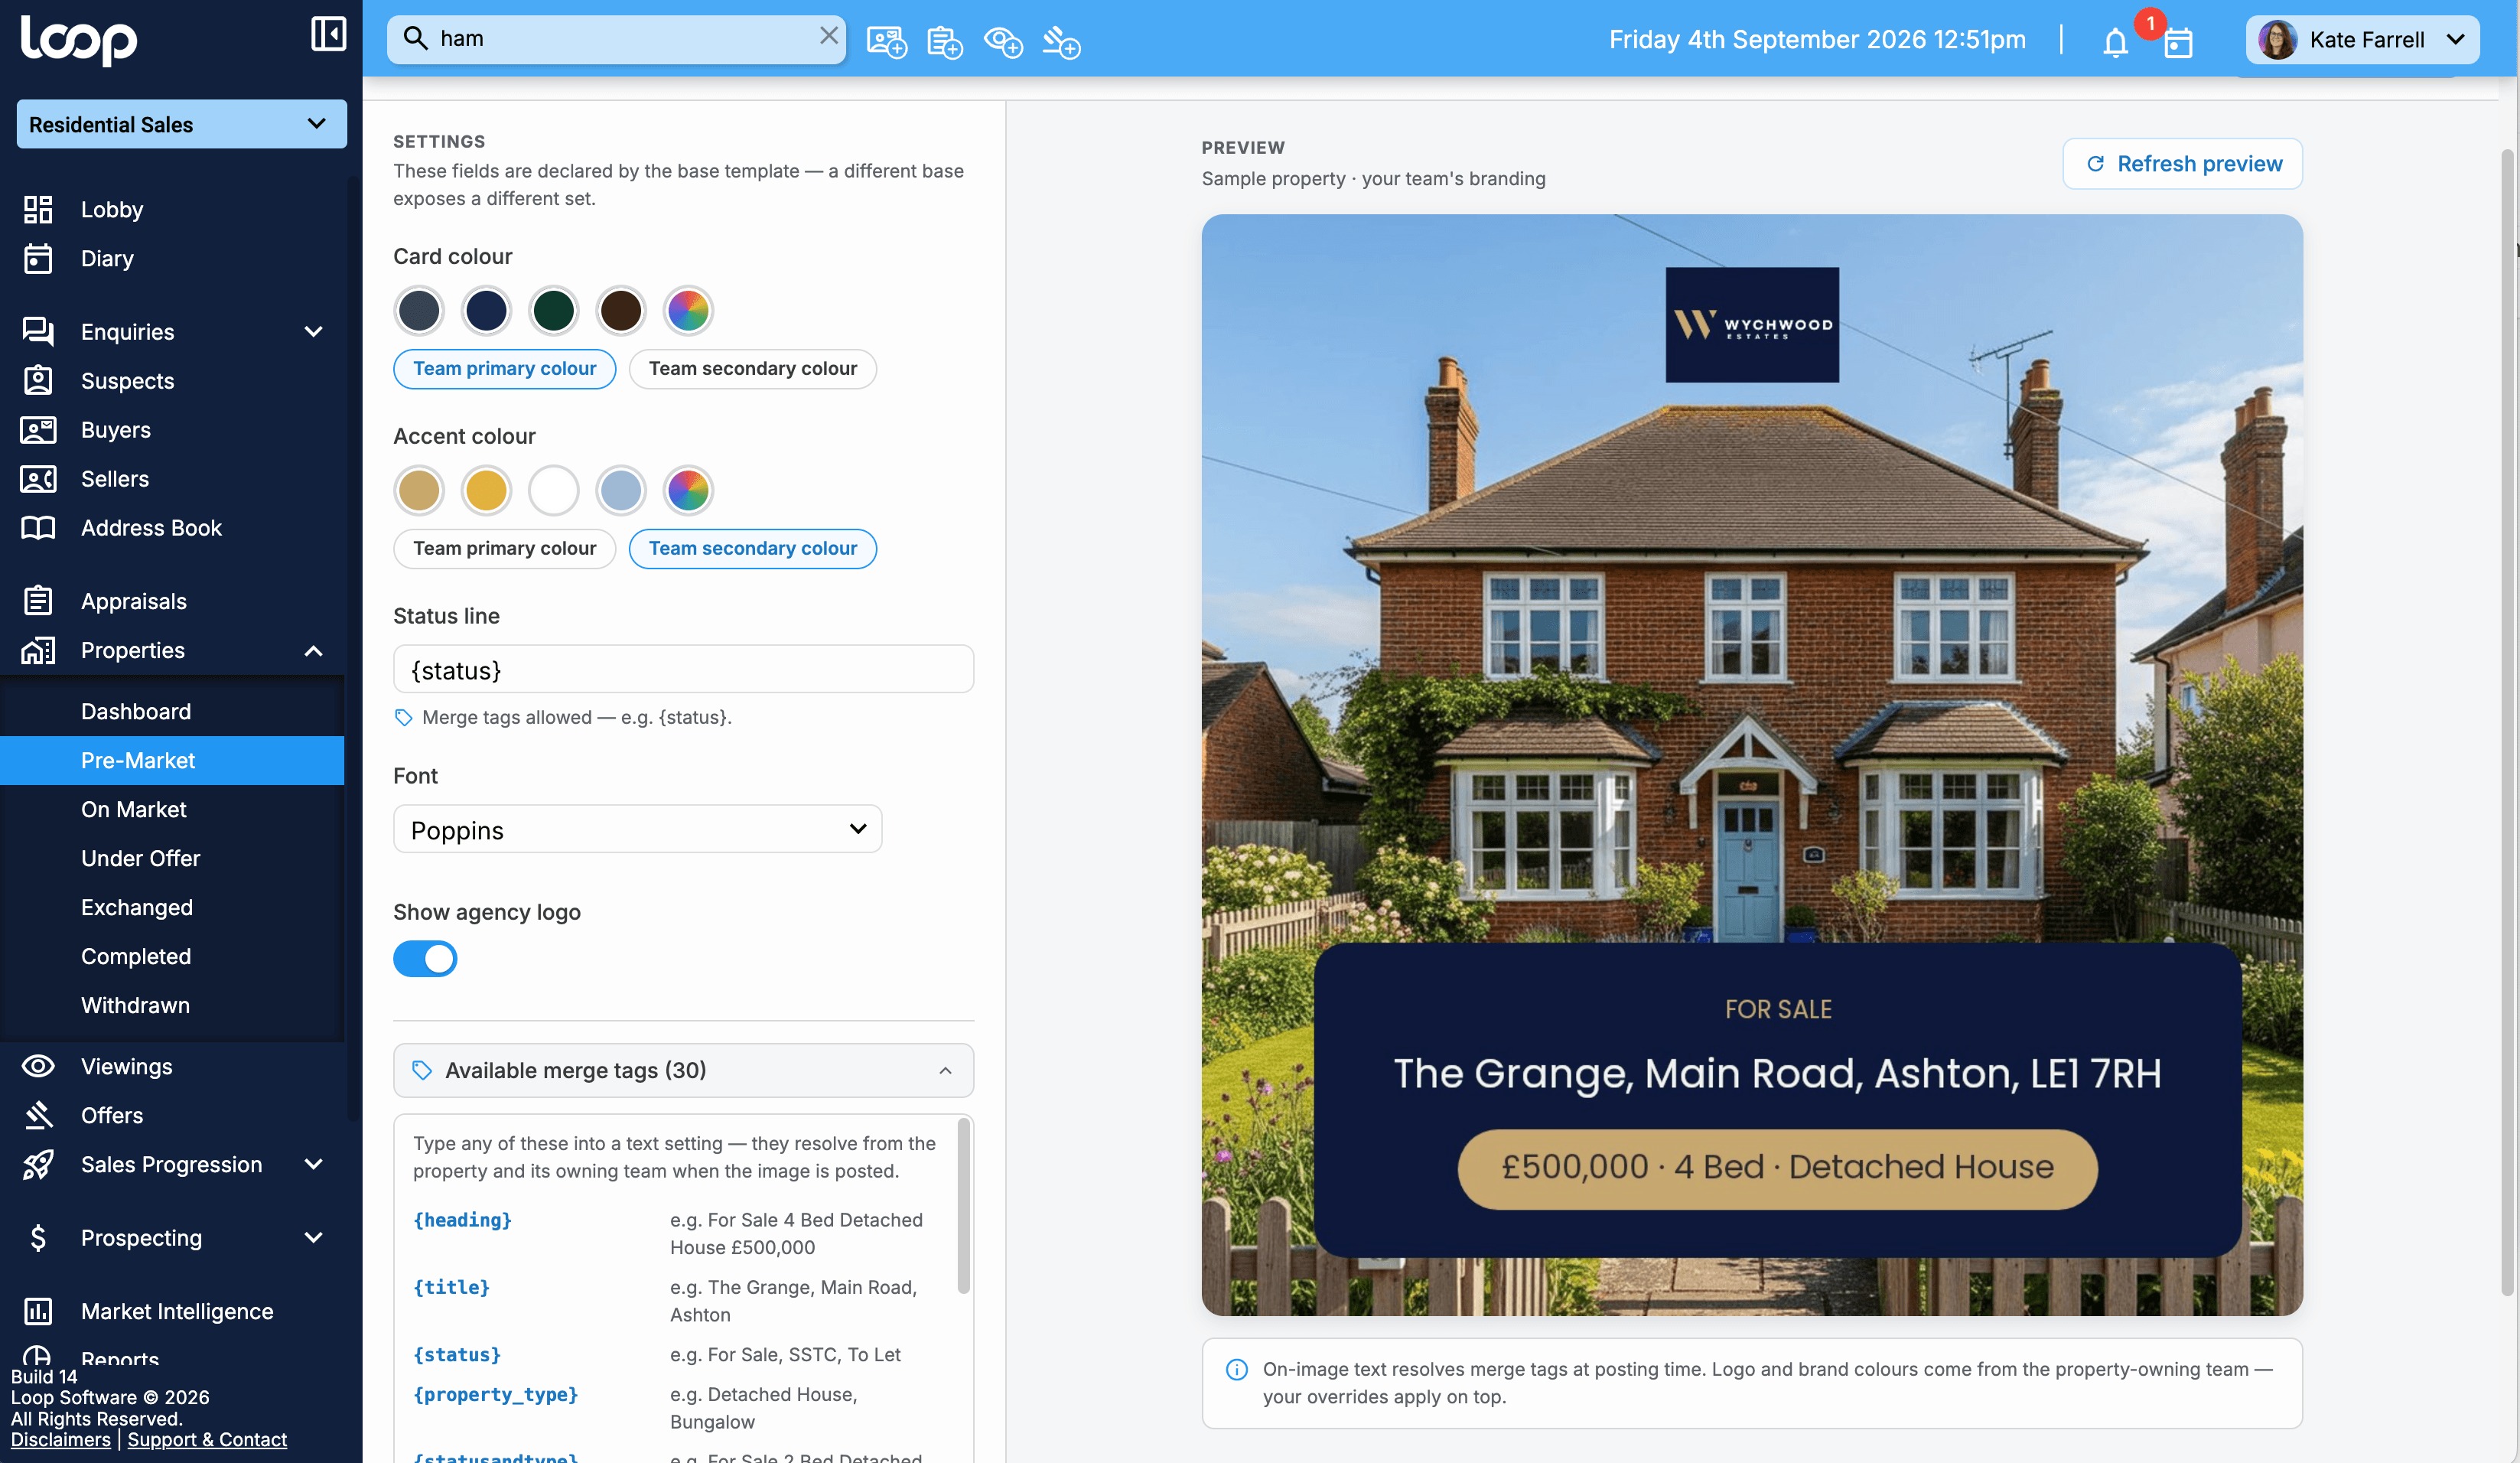
Colours can either follow your branding or be fixed. Each colour setting has two buttons, Team primary colour and Team secondary colour, alongside the swatches. Choose one of those buttons and that part of the design takes its colour from whichever team owns the property, so a single design looks right for every office. Choose a swatch instead, or a colour of your own, and that exact colour is used on every property no matter which team it belongs to.
The logo cannot be changed here, only shown or hidden. The Show agency logo switch is the only control over it. The logo that appears is always the one belonging to the team that owns the property, which is why there is nothing to pick. If you want a different logo on your posts, that means changing the team's logo in your branding settings, not here.
Text on the image can use merge tags. Any text setting, such as the status line, accepts the same tags as your captions. Putting {status} there means the image reads "For Sale" on a property that is for sale, and "SSTC" once it goes SSTC, without you making a second version. The editor lists the tags you can use.
The preview on the right shows the design on a sample property with your own branding applied. Select Refresh preview after a change to see it update. Give it a name, save it, and it appears alongside the Loop originals next time anyone creates a post template.
Editing a saved design changes it everywhere it is used, including on posts already sitting in the queue waiting to go out. If a design is being used by a post template, Loop will not let you delete it without dealing with that first, so nothing breaks quietly.
The social media dashboard
Select Social Media in the main navigation sidebar. There are three tabs, and a Team filter in the top right that starts on All Teams if you work across more than one.
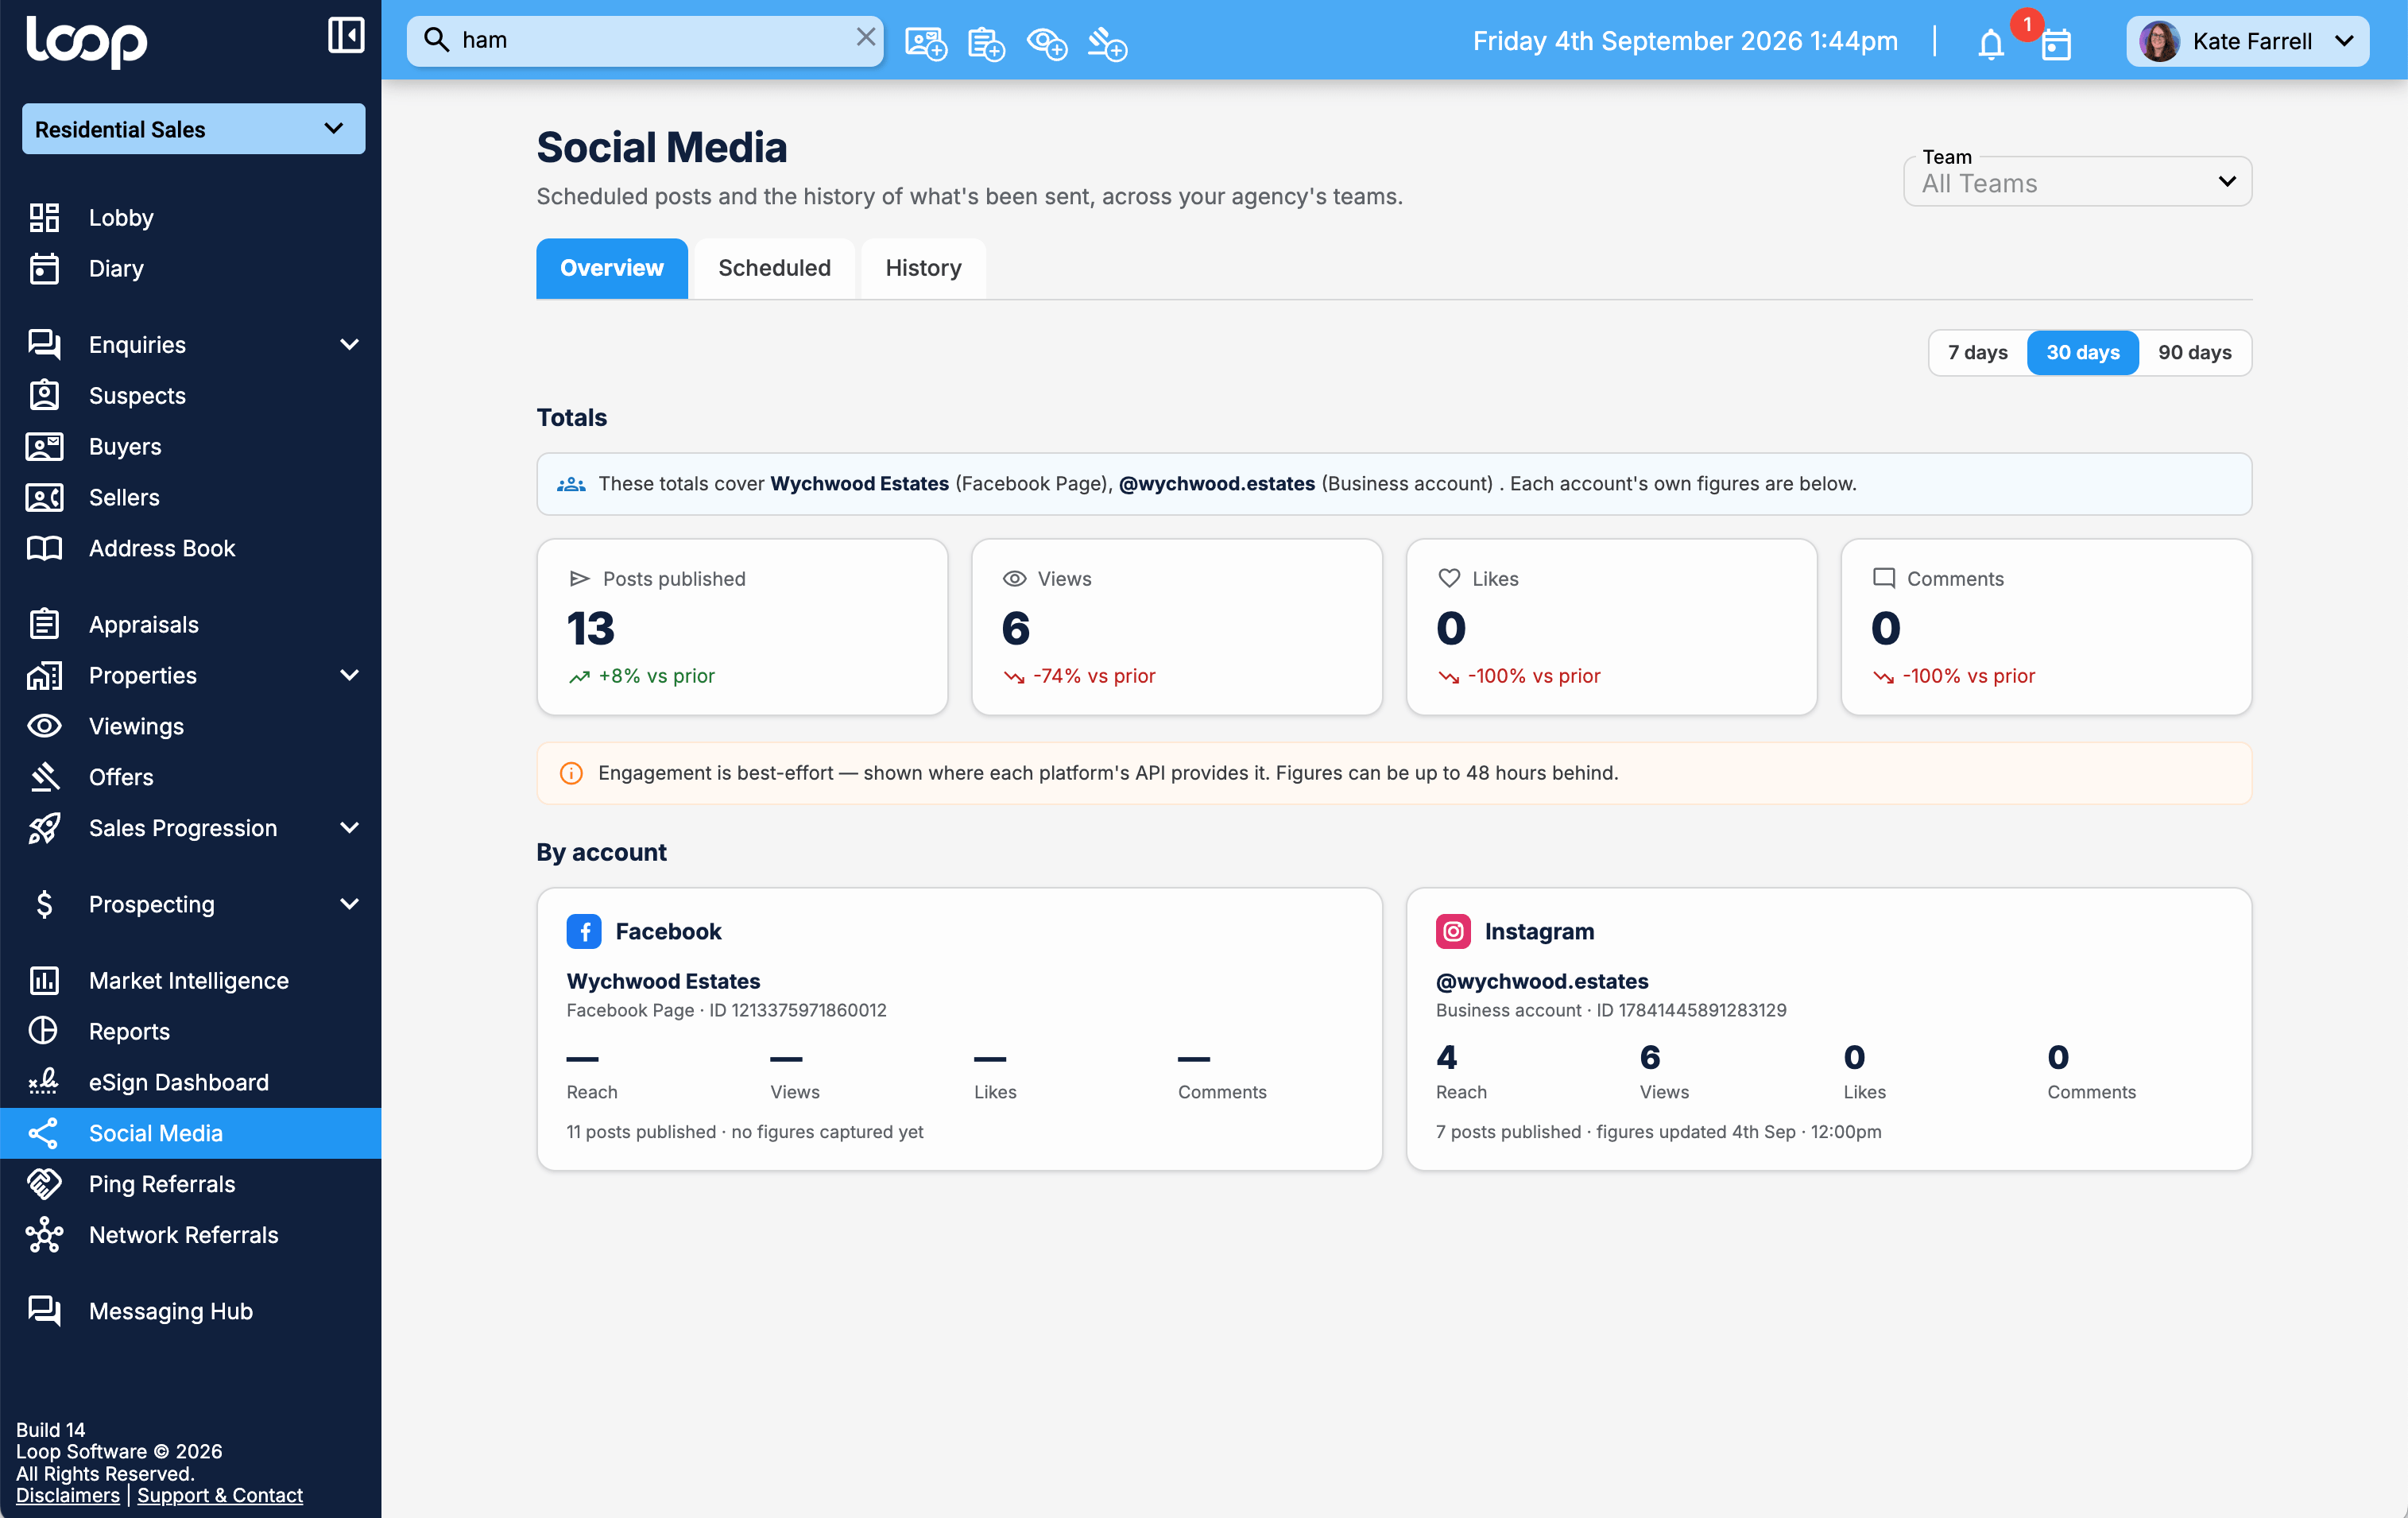
Overview is where you land. It shows your totals for the last 7, 30 or 90 days: posts published, views, likes and comments, each with how that compares with the period before. Underneath, the same figures are broken out for each connected account. Engagement is best effort, so you will only see figures the platform itself provides, and they can be up to 48 hours behind.
Scheduled lists everything waiting to go out. This is where you change the template, the platforms or the posting style, move a post to a different time, or cancel it, right up until it fires. After that it has gone, and cancelling is no longer an option.
History lists what has already gone out, most recent first. Each row shows the property, which platforms it went to, who sent it, which team it belongs to, the property's status at the point it was posted, and the outcome: published, partially failed, failed or cancelled. Reach, likes and comments sit alongside where the platform provides them. You can filter by status, by platform, and by the last 7, 30 or 90 days, and the list is paged so a long history stays manageable.
Common questions
Can I post to LinkedIn? Not yet. Facebook and Instagram are what is available at the moment.
Can I post a video, a Story or a Reel? No. Posts are still images, either your designed image, the property photographs, or both together.
Can I boost a post or pay to promote it from Loop? No. Posting is free, and anything paid is done on the platform itself.
Does this cost extra? No. It is part of Loop Residential Sales and Lettings.
Who can post? Anyone who uses Loop, for the teams they work in. Connecting the accounts and deciding which teams use them is an admin job.
Can I reply to comments in Loop? No. Comments and messages are handled on Facebook and Instagram as usual.
Someone else scheduled a post and they are off. Can I change it? Yes. Scheduled posts belong to the team rather than to the person who set them up, so anyone in the team can edit or cancel them from the dashboard.
Why did my scheduled post cancel itself? The property's status changed after it was scheduled. Loop will have sent you a note saying so. If the property is back on and you still want the post, schedule a new one.
Will editing a template change posts I have already sent? No. Posts that have gone out are fixed. Scheduled posts pick up the change, because they are built when they send.
Our teams have different colours. Do I need a design each? No, as long as the colours in the design are set to follow the team rather than to a fixed swatch. One design will then come out in each office's own colours.
Why are my likes and comments showing as zero, or as a dash? A dash means the platform has not given us any figures for that post yet. Zero means it has, and the figure is zero. Engagement can be up to 48 hours behind.
If something is not working the way this article describes, get in touch with support with the property and the platform involved and we will take a look.
See also: Connecting your social media accounts
Was this article helpful?
That’s Great!
Thank you for your feedback
Sorry! We couldn't be helpful
Thank you for your feedback
Feedback sent
We appreciate your effort and will try to fix the article
